
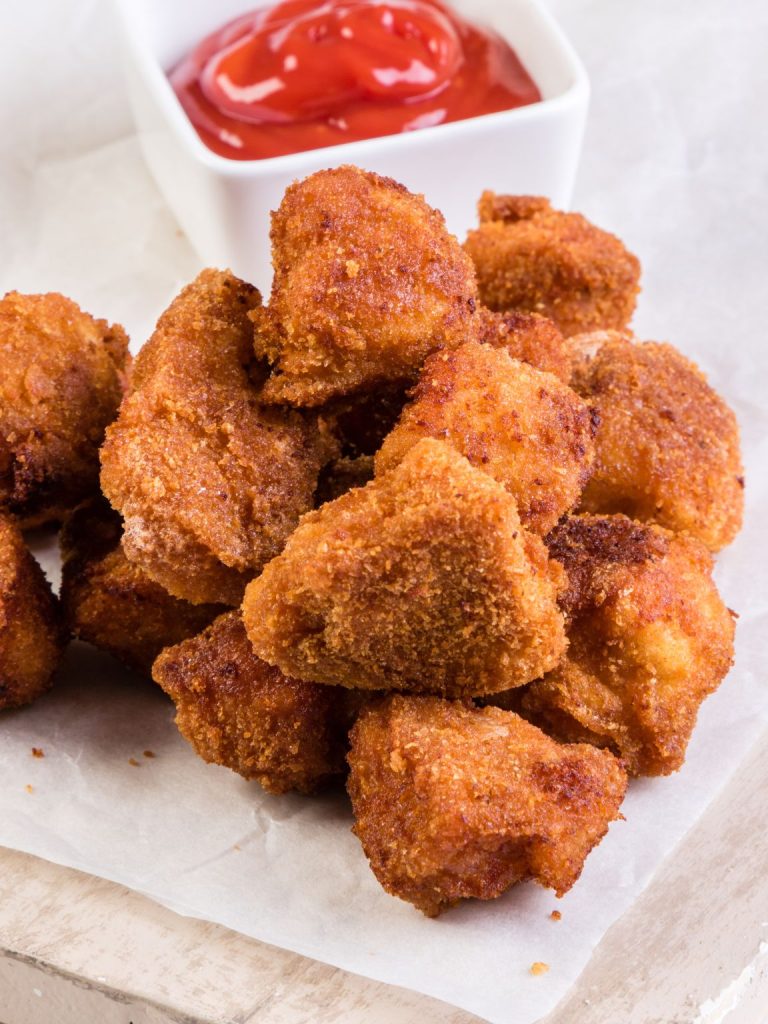
These crispy homemade chicken nuggets are the ultimate comfort food, juicy inside, golden outside, and seriously addictive!! You’ll never need to grab the frozen kind again once you see how quick and easy these are to make from scratch.


They’re crunchy, perfectly seasoned, and ready in about 25 minutes, exactly what you want on a busy weeknight! I love serving them with a drizzle of honey or dunked in ranch, but honestly they’re good with anything. Try pairing them with my Easy Kale Pomegranate Salad for something fresh or go full cozy-mode with a bowl of Creamy Potato Soup.
Why You’ll Love This Recipe
- That CRUNCH! You know that moment when you bite in and hear that perfect crackle? Yeah… that’s this recipe. Crispy on the outside, juicy inside, basically, the dream chicken nugget.
- Simple, everyday ingredients. We’re not doing anything fancy here, just chicken, flour, breadcrumbs, and a few spices you probably already have in your cupboard. It’s the kind of meal you can throw together when everyone’s hungry right now…
- We all love a quick win. You can go from prep to plate in under 30 minutes and no one will believe they weren’t takeout. It’s one of those recipes you keep in your back pocket for “I don’t feel like cooking, but we’ve gotta eat” nights.
- A hit with everyone. Kids, grown-ups, picky eaters… we’ve tested it on all of ’em, and it always disappears fast. (If you’re lucky, you’ll get a few leftovers for yourself later, emphasis on if 😋)
- Totally customizable. Want them extra crunchy? Use panko. Feeling spicy? Add a little cayenne. Wanna bake instead of fry? Go for it! They’ll still come out crisp and golden.

Ingredients
This gives you the basics and a quick why-it-matters rundown… For exact measurements and full step-by-step instructions, scroll down to the recipe card at the bottom.
- Chicken: The star of the show! Boneless, skinless chicken breasts cut into bite-sized pieces. They cook fast and stay super juicy inside (you can use thighs if you want even more flavor!).
- All-purpose flour: This gives the chicken its first light coating, it helps everything else stick. Think of it as the base layer that sets the crunch in motion.
- Eggs: Act like glue to hold that breadcrumb coating right where it belongs. Lightly beaten is all you need.
- Breadcrumbs: The magic maker! They turn that golden brown and give you that irresistible crunch. Use panko for an even crispier bite.
- Garlic powder: A little garlic flavor goes a long way. It gives your nuggets a savory BOOST without overpowering anything.
- Paprika: Adds that warm color and hint of smokiness, it’s what makes your nuggets look as good as they taste.
- Onion powder: Rounds out the seasoning so every bite tastes balanced and flavorful.
- Salt and pepper: Don’t skip these! The right seasoning makes all the difference.
- Oil for frying: Vegetable or canola works great here. You just want something that can handle the heat and crisp things up beautifully.
For extra flavor (optional):
- Cayenne pepper: For a little kick, totally optional, but SO good if you like a hint of spice!
- Grated Parmesan: Adds a touch of salty richness to the coating (try it once… you’ll do it every time).

How to Make Crispy Homemade Chicken Nuggets
1. Prep your coating station:
Set out three shallow bowls, one for the seasoned flour, one for the beaten eggs, and one for the breadcrumbs. (Trust me, having it all lined up makes the process way easier and way less messy!)
2. Season the chicken:
Toss the chicken pieces with a pinch of salt and pepper so the flavor starts from the inside out. Little detail, big difference.
3. Coat each piece:
Dip the chicken in flour first, then into the egg, and finally into the breadcrumbs. Press the crumbs on gently so they stick. That triple layer is what gives you that restaurant-style crispness!
4. Heat the oil:
Pour about an inch of oil into a large skillet and heat it over medium-high. You’ll know it’s ready when a breadcrumb sizzles right away, that’s your green light!
5. Fry in batches:
Cook the nuggets in small batches so they don’t crowd the pan. Each one should take about 3–4 minutes per side, until golden brown and cooked through. (If the oil gets too hot, just lower the heat a bit, slow and steady WINS here.)
6. Drain and cool:
Transfer the nuggets to a paper towel-lined plate to catch any extra oil. Sprinkle with a little salt while they’re still warm for that extra flavor punch.
7. Serve and enjoy!
Grab your favorite dips (ketchup, honey mustard, or even ranch) and dig in! They’re crispy, tender, and totally irresistible… fair warning: they disappear FAST!
How to Store
- To store: Let the nuggets cool completely, then pop them into an airtight container. They’ll keep in the fridge for up to 3 days, perfect for lunchboxes or quick snacks later in the week!
- To freeze: Lay them on a baking sheet in a single layer, freeze until solid (about an hour), then transfer to a freezer bag or container. They’ll stay good for up to 2 months.
- To reheat:
- Oven: 400°F for 10–12 minutes, keeps them nice and crispy.
- Air fryer: 375°F for about 5–6 minutes, my favorite way, honestly.
- Microwave: Works in a pinch, but they’ll lose that crunch… still tasty though!
Oliver’s tip:
I always make a double batch and stash half in the freezer. On those nights when everyone’s hungry right now, you can pull them out, reheat, and BOOM, dinner’s done! No stress, no dishes, just happy faces at the table.
There you go! Crispy, juicy, homemade chicken nuggets that honestly beat anything you can buy at the store. Once you make them yourself, you’ll see how EASY (and kinda fun) it is to do… We make these all the time when we just want something that feels a little special but still totally stress free.
If you try this recipe, let us know how it went! Drop a comment below, we really do read them all, and it makes our day hearing that you’re cooking these recipes in your own kitchen.
Crispy Homemade Chicken Nuggets
Ingredients
- 1 lb boneless skinless chicken breasts, cut into bite-sized chunks
- 1 cup all-purpose flour
- 2 large eggs beaten
- 1 cup plain breadcrumbs or panko for extra crunch
- 1 tsp garlic powder
- 1 tsp paprika
- ½ tsp onion powder
- ½ tsp salt
- ¼ tsp black pepper
- Oil for frying vegetable or canola
- Pinch of cayenne pepper for heat
- 2 tbsp grated Parmesan for extra flavor
Instructions
- Prep your coating station: Set out three bowls, one for the seasoned flour, one for the beaten eggs, and one for the breadcrumbs.
- Season the chicken: Toss the chicken pieces with a little salt and pepper to start building flavor.
- Coat each piece: Dip each piece of chicken in flour first, then egg, and finally breadcrumbs. Press the crumbs on gently so they stick.
- Heat the oil: Pour about 1 inch of oil into a large skillet and heat over medium-high until a breadcrumb sizzles on contact.
- Fry in batches: Add the chicken pieces in small batches and cook for 3–4 minutes per side until golden and cooked through. Adjust heat as needed.
- Drain and cool: Transfer nuggets to a paper towel-lined plate and sprinkle lightly with salt while warm.
- Serve and enjoy: Serve with your favorite dips like ketchup, ranch, or honey mustard.
Notes
- For crispier nuggets, use panko breadcrumbs.
- You can swap chicken breasts for thighs if you prefer darker meat.
- Keep the oil hot but not smoking to avoid soggy nuggets.
- Leftovers store well in the fridge for up to 3 days or freeze for up to 2 months.
- To bake instead of fry, cook at 400°F (200°C) for 18–20 minutes, flipping halfway through.

Leave a Reply